March 30, 2013

"Our Christ is Alive!"


Thousands, ten thousands, even millions will proclaim the resurrection of Jesus Christ form the dead this weekend.  This Easter - Resurrection Sunday - more likely than not, you will be greeted with a jubilant "He is risen!" You will respond, "He is risen indeed."

You may say it because it is expected.  You may not even think about it, but simply say it out of habit. Or you might actually believe it and say it from the depths of your heart.  You may realize how crucial this truth is to your faith and salvation and, overcome with wonder, just utter it in a reverent whisper.

"He is risen ."

Then, full of thankfulness for Christ's sacrifice and his power that has put to death sin and death itself, you repeat it:

"He is risen indeed."

In joy, meditating on this miraculous event and realizing that it is finished; the war has been won; the blow has been dealt; Jesus will be the victor; and that he has set his people free you cry out again:

"He is risen!  Our Christ is alive!"

What would you give to say those words?  

We, with our "first world" problems, new easter outfits, chocolate and egg hunts don't usually think about what we are doing.  Easter is a holiday for getting together with extended relatives, dressing up, eating Ham, relaxing, going to an extra church service maybe and getting some extra sleep, right?  I mean, come on, the easter bunny is a pagan tradition, right?  So easter is just another excuse catch up on school and hang out.  

Is it?  Yeah, I get the whole bunny thing, I think it is pretty messed up too, but let's not throw out the baby with the bathwater.  In this country we have the awesome opportunity to proclaim from the housetops that Jesus is alive!


We have a savior who lives!  Do you understand how big of a deal this is?  It is incredible.  We should be so super psyched about this.  If not for our own sakes we should be excited and on fire about this for our brothers and sisters who can't be.


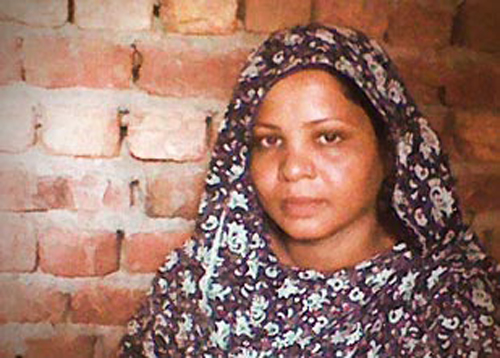
Asia Bibi.  You've probably heard about her by now because her story is all over the web.  Voice of the Martyrs brought her story to the world's attention back in 2009 when she was arrested, convicted of blasphemy under pakistani law and sentenced to death for the following:

"Our Christ sacrificed his life on the cross for our sins. 
...Our Christ is alive."

Three years later, thanks to international cries for mercy and petitions, Asia is still alive.  But she still sits in prison.  Would consider joining the cry for mercy?  Will you sign the petition and pray for her release with thousands around the globe?

Would you stand like Asia for what you believe?

Would you still say that Christ is alive, if it cost you your life?

March 19, 2013

FIRE Basketball


Our family tried something new this past year.  Being a sports family...sorta.  Nathanael joined the Rockford FIRE basketball team!


Many of the kids and coaches go to and have kids in our homeschool co-op.  It is a Christian homeschool team and they're pretty awesome.


Nathanael plays on the 14U (That means '14 and under' for those of you who are as sports illiterate as I) team.  FIRE also has a 12U, JV, and Varsity teams.  We've gone to couple games and I think it is safe to say I'm hooked.


The first few games/practices I brought like 3 books along thinking I could read when it got slow.  It turns out that it isn't much good because you keep losing your page when you have to clap every couple seconds.  So I gave it up and dedicated myself to sitting in the back row looking very austere and clapping formally.


Not so any longer.  I yelled and cheered for the first time last Monday and I was (yikes!) in the front row.  This is dangerous folks.  There is so much momentum in both the basketballs and the kids that if something goes wrong you're pretty much toast.


One of the Mom's got sacked at an away game we went to and a couple people have had to react with gazelle like speed to catch a ball that was headed straight for the top knot of their grandmas.


It has been a good experience and I'm glad Than likes it.  His team won 20 of their 22 games and their regional championship and are now wrapping up the season now with a week at Nationals.  Go FIRE!


My brother is number 53, if you couldn't tell. :-)


And, if you haven't already seen this movie that has been circulating because of its uniqueness, check it out.  A player from the opposing team gives the ball to a player from the other team so he can make his first point ever.  It means a lot more to me having a brother in basketball now.


March 13, 2013

Girl's Pillowcase Dress Tutorial


Sewing projects for Emily are just so quick and easy.  No fitting around curves and messing with yards of fabric to get a satisfactory result. Just an old pillowcase, but my, what a lovely pillowcase it is.  Now Emily has  a dress made out of bedsheets too! ;-)


Supplies: One pillowcase (or sham, if you prefer), and one package of seam binding.  You can also make your own bias tape.

Why do people not make bedding like this anymore?

1) Cut off the seam at the end of the pillowcase //  2) Get a shirt that fits your little girl (cute, right? :-)


3) Measure from neck to underarm // measure from side to edge of front

*Ok, this might get confusing.  Go the finished project and get a good look at it, then look at step 5 and imagine how it is going to become the dress.  Worst case, read the whole thing and then come back here. :-)*

In the above left, the two red pins at 3 1/2 and 4 1/2 represent where I want the dress neckline (4 1/2) and how much fabric I actually need (3 1/2) because of the casing we are going to make.

Also in the above left, the line of pins at 7 inches represents the underarm line.

On the right we have where I want the dress "bodice" edge to come to; the edge of the front.

4) Move measurements to pillow
Now all these numbers will be different on your girls shirt.  Make sure you're using a shirt that fits!

Above we have a picture of how we are using all the numbers.  First of all, I messed up.  That green pin at 3 1/2 inches?  That should be at 4 1/2.  Imagine it is at 4 1/2.  (Yes!  I do have three different tape measures.  Stay focused people, you only need one.)

Okie dokie.  The top horizontal measure is 3 inches, that is our side to edge of front measurement from the right picture.  The edge we are pinning is the same one we cut at the very beginning of the tutorial, the closed (now open) edge opposite the wide hem. Because now we don't have to hem it!  Yippee!)

The pink vertical measure represents the left picture.  Why doesn't it start at the top?  Because we had those two pink pins.  The top of our pillowcase needs to start at the top pink pin.  So we take the underarm measurement (7" in my case) and subtract the amount from the top pink pin to the top of the shirt (in my case it is still 3 1/2 inches because 7 divides evenly like that).  What is left, (3 1/2) is what you measure from the top of your pillowcase.

5) Fold pillowcase in half lengthwise so that you can cut both corners off at the same time.

6) Cut in an arc.  Cut from one pin to the other so that the line left behind is concave, not straight.

7) Sweet!  Nice job.  Open up the pillowcase to reveal your lovely semicircles.  Bind them with your...binding.

8) On both the front and back  top edges, create a casing by folding it down an 1/8 inch, and then another 3/4 or so.  Just enough to comfortably fit your binding through. Sew them down very close to the edge forming your casing.

It looks so pretty!


9) Sew two 2 ft section of binding to create your ties and pull one through each casing.  And you're done!

It will make pretty gathers that should accommodate your little girl for quite a while.

To make the ties into straps you just tie the front to the back at each end.

Front // Back


If you look closely at the front (above) you'll see that I also added a little pocket.  Little, because I made it with those scraps we cut out for the armholes.  Yup.  "Waste no, want not," they say!

(The pocket isn't on in the pictures where she is trying it on.  I used my extra binding and made a sash for a little waist definition and I LOVE it.


Front // Back


I'll update with pictures after she wears it this summer.  Somehow I don't believe I could convince her to wear it outside in front of our igloo. 

March 9, 2013

High Low Skirt Refashion


Hey folks!  I rarely get sucked into fads and trends.  I like to stick with the classics.  This is usually the case because the trends are immodest or weird.  High-Low skirts fall on the weird side of the spectrum for me.  "Wait, you like that bit of fabric dragging behind you?"  It reminds me of tuxedo tails, and I'm not a big fan of those either.  The really short ones are like a reverse mullet.  You know, except, "party in the front and business in the back" instead of the other way around.

Yeah, so after all that, I still made one. :-)  It can't hurt to try right?  It looked SO easy, it wouldn't cost me anything, and I didn't have to make a "mini skirt with a cathedral train" version.  So here 'tis.  Let me know what you think.


 Before: A mis-shapen skirt I picked up at Goodwill over a year ago to turn into something else.  The front had stretched out and the back hadn't so it was awkward to wear the way it was. The colors, however, are so in right now.  It's funny how trends always come around again.

 1. Try the skirt on.  On the center front, mark where you want the highest part of the hem to be.

2.  Lay the skirt out with the side-seams matched and in the middle.  The center front is the fold on the bottom.  Find you pin.  Start cutting there and gently slope towards the bottom of the skirt as you cut up. Remember to leave room for the hem!  I didn't :-( and it's a bit shorter in the front than I thought it would be.

 3. Try it on and see if you like the drape and lines.  Mine (honestly I thought it looked weird) turned out almost perfect.  I only adjusted one area.


My skirt had a built in lining, which is nice.  I evened out the longer hem so it wasn't so pointy.


4. If your skirt has a lining, pull the main fabric out of the way and trim it straight across just above the highest point.  If you don't, then you'll see the lining when you wear your skirt.

5. Hem your skirt, Hem the lining.  All done!
See?  No more unsightly lining. :-)


Chambray shirts are in, right?  :-)  


P.S. I love tying my shirts.  And I'm going to make some specifically for tying this spring/summer. :-)  Knots and bows are the bomb.


Let's have a round of applause for massive Mr. mirror in the studio.  He makes my life so much easier.

Day light savings tonight folks!