Showing posts with label Tops. Show all posts

August 7, 2013

The Everyday Tunic - Refashion


When my world is shaking, heaven stands
When my heart is breaking
I never leave your hands

Your Hands - J. J. Heller
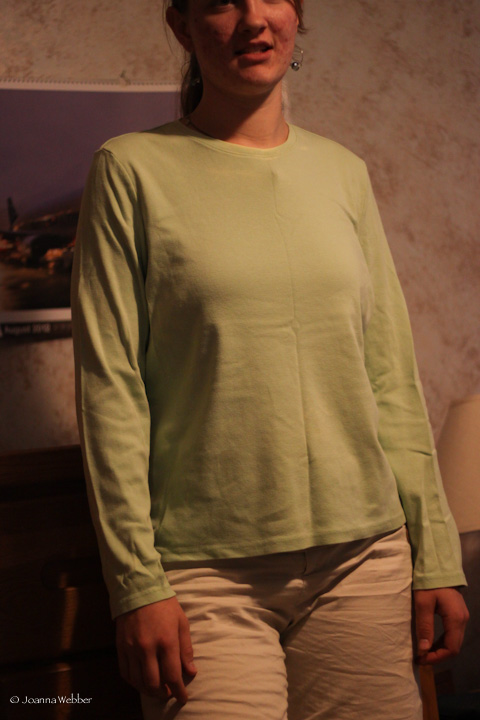


Before                       -                       After

I picked this size 16 Arrow shirt up at a thrift store last Thursday for $1.  It was the first time I had shopped with my friend Brittany.  Needless to say she didn't understand why I was picking up large men's clothing, sheets, and XXXL sweaters. :-) All in good time.


I cut off the sleeves, 


took in the sides,  


hemmed the arm holes and shirred the back.


Even when you start with a big shirt, it is hard to flatter and girl's body with it.  The shirring takes the guess work out of the side seams.


To remove the last bit of "meh" I covered the front pocket in lace.  Presto feminine-o.  Ish.


And it looks splendid with a belt.  I can see this with everything, everyday.  Dress it up with a black pencil skirt and black belt for the office, White pants and fun necklace for dinner, red pants for your favorite hipster concert, maxi skirt and belt for Sunday and shorts for a day around the house!


Voila!  The everyday tunic.

July 23, 2013

Tie-front Blouse Refashion


Before // After

I grabbed this lovely old blouse with shoulder pads, embroidered collar and cuffs from my Grandma's going-to-goodwill bag.  The color was perfect and the hand was beautiful.  Grandma told me how beautifully it draped and washed up.  So I stashed it away.


Inspiration hit a week or so ago and I took the shoulder pads out, un picked the collar and cut off the sleeves.  Presto tank-o!  

I took in the sides, bound the arm-holes and modified the neckline so that I could add ties.


I was able to cut the both sleeves in half lengthwise and have enough fabric for the ties.  Yippee!

I attached it in the back like a collar.  All in all it only took approx. 2 hours!  And now I have a neat blouse and some more experience with ties. :)  I absolutely love them.  I find myself wanting to add ties, cut-outs, or buttons to everything.


 And I'm back to studying!  :-)

July 10, 2013

Tee with a Twist


Post 500 folks!  Check out the poll to the right and vote on what you like most about the blog.  I'm going to be starting a professional photography blog in the near future, so I'd like to know what you want to see more of here. :-)

I've been becoming increasingly interested in all things nautical.  Stripes, red, navy, blue, white, anchors, knots, rope, boats, hats you name it!  So when Mum gave me a way-to-large-but-super-comfy navy tee I saved it.  

Exhibit A: with the side already pinned. (and a bunch of recent garage sale finds strewn all over the room)


Cutting based on a well fitting shirt that has cute little raglan cap sleeves.  Leaving room for seam allowance!


After it was all sewn up, I found some macramĂ© cord (it looks just like rope!) and hand-stitched is in a swirly pattern around the neckline and sleeves.  Easy peezy boss!


August 23, 2012

Asparagus Knit Tee Refashion


Hey Guys!  I've never really done a refashion before.  I just don't think about getting clothes at good will that don't fit.  It always just slips my mind for some reason. ;-)  Anyway, I saw this t-shirt weaving thing on pinterest that pretty cool so I pinned it for later.  Then I got handed down this light green asparagus colored t-shirt.  It was a large AND had been all stretched out from wearing and washing.  I was going to throw it away, so I figured I could try the technique on it.


Before ---------------------------------------------------------After


If you're interested in doing it yourself, above is the tutorial.

This does shrink the sleeves and scrunch them up so keep that in mind when picking out your shirt.  It would be perfect for really big sleeves that are too short.  You know, that awkward length where you can see your wrist joint?  Yeah, that shirt.  The one you never wear without rolling up the sleeves. :-)

I made my slits about an inch wide, so when I unfolded it they were around 2 inches.  I just wung (spelling?  winged it?  wung it?  hmmm...) it and made them approxamately 1/2 inch apart.  With the thickness of this knit I was only able to get 3 round of weave in.

So far it is fine, but I haven't washed it yet, so I don't know how it will hold up.  


See that pucker above the shoulder up there?  That is the part I don't get.  There aren't any good directions about how to secure the top part of the weave so I just stitched it down in the least visible and awkward way.


I also cut the crewneck off and widened the neckline.  I didn't not intend for it to get this wide, but I didn't account for stretch. :-(  Oh well, at least is isn't falling off my shoulders.  I finished it with variegated green thread in a blanket stitch.  Since it is knit you don't need any serious finishing, this was just for looks and to prevent any further stretch.


I serged in the side seams an inch a piece and then added a hand-stitched line around the bottom to tie in the neckline.


And here is my little photographer for today and tomorrow's post. :-)  She is only 7 but with some coaching she did a pretty good job.  It is cute but a bit hilarious watching her hold up a heavy camera the size of her head. :-)

P.S. Do you know how hard it is to get 2 faces in a 50mm lens?  

August 21, 2012

Mahogany Knit Cardi-Wrap


Pattern: Simplicity 2603 view A
Fabric: Beautiful knit fabric from Joanns.  Sorry, I have no clue what it is but it reminds me of a bamboo knit.  It was pretty expensive so it actually could have been...I got it with a coupon though. :-)

Anyway, now for my sob story.  I got this pattern years ago and always thought it looked classy.  I got it out shortly thereafter to experiment with the tank portion of it.  That turned out to be a bit of a fail but what do you expect when you make a knit sized pattern with fabric that doesn't stretch AT ALL?  Yup, never doing that again.


Well, when I needed a very versatile sweater, or "jumper" as they call it, to take to London with me I splurged on some really nice fabric and dove in.  Much to my chagrin I found that I had missplaced the back, sleeve, and cuff parts of the pattern.  Thank God I still had the important front piece!  Anyway, after some deliberation I decided to wing it and make it anyway.  So.  I used one pattern piece and some of the directions from this pattern. :-)


You cut two identical front pieces which join at the base of the neck.  There are some puckers because I wasn't sure how to size the top edge of the back piece that I made up.  Thankfully this is a knit project and you can barely see the mistakes I made and  places I stretched to make the made-up-sleeves fit with the made-up-back.  :-)  Gotta love it.


As cute as the shorter version combined with 3/4 sleeves was I was bringing this along for warmth so I made it long and put long sleeves on it.  I'm so glad I did.  I wore it almost everyday before I left and then for the first 7 days of the trip.  It was cold and rainy you see. :-)


As you can see there are many, MANY, ways you can wear it.  My favorite is the left one above.  Twisted twice and tied in the back.


And yes, I did take these picture right after I took the ones for the skirt in the previous post. :-)


This is so incredibly comfortable and now my Mom wants one. :-)