August 23, 2012

Asparagus Knit Tee Refashion


Hey Guys!  I've never really done a refashion before.  I just don't think about getting clothes at good will that don't fit.  It always just slips my mind for some reason. ;-)  Anyway, I saw this t-shirt weaving thing on pinterest that pretty cool so I pinned it for later.  Then I got handed down this light green asparagus colored t-shirt.  It was a large AND had been all stretched out from wearing and washing.  I was going to throw it away, so I figured I could try the technique on it.
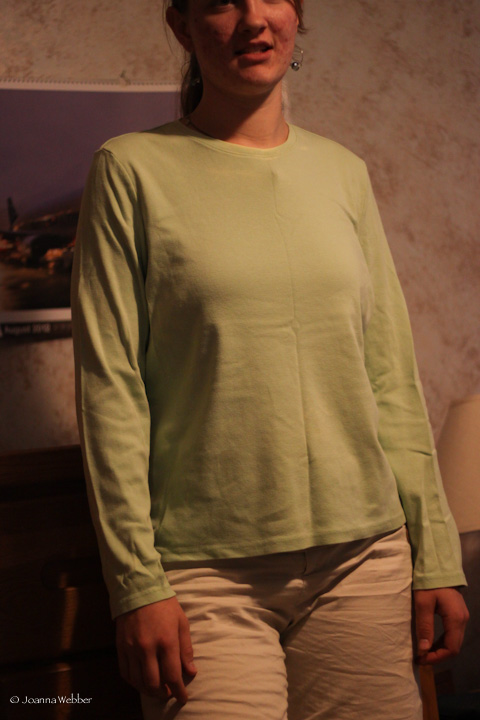

Before ---------------------------------------------------------After
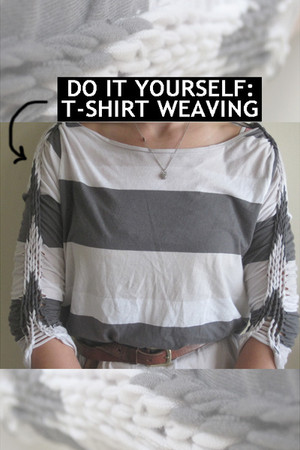

If you're interested in doing it yourself, above is the tutorial.

This does shrink the sleeves and scrunch them up so keep that in mind when picking out your shirt.  It would be perfect for really big sleeves that are too short.  You know, that awkward length where you can see your wrist joint?  Yeah, that shirt.  The one you never wear without rolling up the sleeves. :-)

I made my slits about an inch wide, so when I unfolded it they were around 2 inches.  I just wung (spelling?  winged it?  wung it?  hmmm...) it and made them approxamately 1/2 inch apart.  With the thickness of this knit I was only able to get 3 round of weave in.

So far it is fine, but I haven't washed it yet, so I don't know how it will hold up.  


See that pucker above the shoulder up there?  That is the part I don't get.  There aren't any good directions about how to secure the top part of the weave so I just stitched it down in the least visible and awkward way.


I also cut the crewneck off and widened the neckline.  I didn't not intend for it to get this wide, but I didn't account for stretch. :-(  Oh well, at least is isn't falling off my shoulders.  I finished it with variegated green thread in a blanket stitch.  Since it is knit you don't need any serious finishing, this was just for looks and to prevent any further stretch.


I serged in the side seams an inch a piece and then added a hand-stitched line around the bottom to tie in the neckline.


And here is my little photographer for today and tomorrow's post. :-)  She is only 7 but with some coaching she did a pretty good job.  It is cute but a bit hilarious watching her hold up a heavy camera the size of her head. :-)

P.S. Do you know how hard it is to get 2 faces in a 50mm lens?  

August 22, 2012

Graduation Party Flowered Summer Dress


Patterns:  Butterick 6467 Bodice view B w/o sleeves size 10
Newlook 6589 Skirt size 10
Fabric: Vintage Green/yellow flowered bedsheet (goodwill)
Yellow table cloth (sharestuff)
White sheet for lining


I had an afternoon grad party with games and food and then we hired an English Country Line Dancing caller to come till sunset so we could dance.  My dress had to be cool because even though it was May 19th is was very warm.


I used the bodice from Butterick 6467 because I knew the fit was tried and true and I wanted to try a lace insert in the bodice.  As that was the case I did not raise the neckline any.  I didn't use the sleeves either.


 Also at my party I would be playing a good deal of volleyball and ultimate frisbee so I had to be able to run.  Que the Newlook 6589 skirt.  I know I can run in this because I've made it at least once.  Remember this green dress?


I remember falling in love with the lace on the bottom of that dress's lining, so I did in on this one as well.


Originally I was only planning to have lace at the neck, but I ended up having on the lining hem and as a sash as well. :-)  


While I was planning this I tried a bunch of different ways that I could sew the lace down while I had the right sides together but I found that it is humanly impossible.  Bummer.  So I just basted it and gingerly unpicked what I had to to insert the lace.  Then I topstitched around the neckline and armholes twice.

For absolute accuracy I hand-stitched the zipper in.

 The dress is fully lined, which means you don't have to wear anything under it and it is made of sheets so there is absolutely no chance of it shrinking.  :-)  The bummer with this is it is actually very heavy.


It's got to look just as neat on the inside as the outside. :-)
I usually wear it now with a cute belt at the empire waist or with a fun denim jacket. :-)  Gotta love it! 

August 21, 2012

Mahogany Knit Cardi-Wrap


Pattern: Simplicity 2603 view A
Fabric: Beautiful knit fabric from Joanns.  Sorry, I have no clue what it is but it reminds me of a bamboo knit.  It was pretty expensive so it actually could have been...I got it with a coupon though. :-)

Anyway, now for my sob story.  I got this pattern years ago and always thought it looked classy.  I got it out shortly thereafter to experiment with the tank portion of it.  That turned out to be a bit of a fail but what do you expect when you make a knit sized pattern with fabric that doesn't stretch AT ALL?  Yup, never doing that again.


Well, when I needed a very versatile sweater, or "jumper" as they call it, to take to London with me I splurged on some really nice fabric and dove in.  Much to my chagrin I found that I had missplaced the back, sleeve, and cuff parts of the pattern.  Thank God I still had the important front piece!  Anyway, after some deliberation I decided to wing it and make it anyway.  So.  I used one pattern piece and some of the directions from this pattern. :-)


You cut two identical front pieces which join at the base of the neck.  There are some puckers because I wasn't sure how to size the top edge of the back piece that I made up.  Thankfully this is a knit project and you can barely see the mistakes I made and  places I stretched to make the made-up-sleeves fit with the made-up-back.  :-)  Gotta love it.


As cute as the shorter version combined with 3/4 sleeves was I was bringing this along for warmth so I made it long and put long sleeves on it.  I'm so glad I did.  I wore it almost everyday before I left and then for the first 7 days of the trip.  It was cold and rainy you see. :-)


As you can see there are many, MANY, ways you can wear it.  My favorite is the left one above.  Twisted twice and tied in the back.


And yes, I did take these picture right after I took the ones for the skirt in the previous post. :-)


This is so incredibly comfortable and now my Mom wants one. :-)

July 25, 2012

Jegging Maxi Skirt


I'm really excited about this skirt.  I love the long maxi skirt fashions that are in these days so I've been planning on jumping on the band wagon and making a whole bunch of my own. :-)

This one is based very loosely on Butterick 3134. View C
Fabric: Jegging (jeans that are technically leggings) fabric on sale for $3 a yard.  Oh, yeah!  This stuff is perfect too because it looks like a lovely long denim skirt, but the drape is much nicer and it is as comfortable as your basic knit maxi skirt!

I cut the skirt for view C on a fold (except narrower as the fabric would permit) and made it longer.  I actually just cut out a rectangle for the waistband.  So I guess you could say I was just inspired by it.   There is no closure, which is sweet.  Knits rock.  

I wore it in London and Paris a lot.  I tried to not wear it when it was raining though because it is so long it just soaks up all the water. 

 When I was at the Eiffel Tower it was gorgeous and then it started pouring so the bottom 10 inches got super heavy and sand-laden. :-)


Side


Back 


Twirls!  :-)
When sewing knits like this you've got to make the pattern 2 sizes smaller than you normally would.  It stretches so nicely, but if it is too big it just falls off. 


Nice skinny hem.

I just realized that this skirt makes me looks short (-er, ish, etc.)  Haha.

P.S. Do you like this dynamic view design?  I'm not sure how I feel about it, but it is really simple and I like that aspect.